OLT Capacity Planning for GPON Access NetworksPlan OLT capacity for GPON OLT systems and EA5800 capacity planning, optimizing GPON split ratio and OLT uplink design for scalable fiber access.
Enterprise OLT Platform Selection for Fiber AccessDesign enterprise OLT platform strategy for GPON OLT platform, modular OLT chassis, and OLT service boards to scale passive optical LAN and XG-PON evolution.
Tunnel Video Surveillance VLAN Stability over FiberDesign stable tunnel video surveillance VLANs using optical transport backbone and Arista fiber aggregation for resilient Huawei OptiX OSN CCTV networks.
Fiber vs Copper in Industrial Networks Design GuideCompare fiber vs copper in industrial ethernet, plan hybrid industrial fiber network designs, and select rugged ethernet switches and industrial SFP transceivers.
In today’s rapidly evolving network environments, upgrading your infrastructure to meet growing demands for performance, security, and automation is critical. This guide is tailored for network engineers and IT professionals planning to upgrade from Cisco Catalyst 2960 series switches to the more advanced Catalyst 9300 series. It covers all essential aspects—from preparation and configuration migration to upgrade execution, risk management, and best practices.
Part 1: Why You Should Upgrade from Cisco Catalyst 2960 to Catalyst 9300 Switches
Cisco Catalyst 9000 series switches represent Cisco’s next-generation enterprise LAN access, aggregation, and core platforms designed for hybrid work and enhanced security.
Key advantages of upgrading from Cisco 2960 to 9300 include:
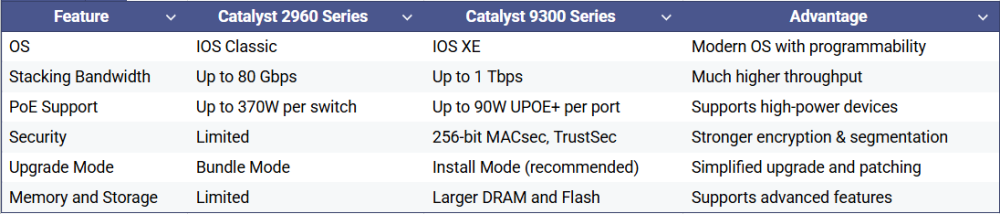
Performance and Scalability: Catalyst 9300 supports up to 1 Tbps stacking bandwidth versus 80 Gbps on 2960-X/XR, multi-gigabit speeds, and 90W UPOE+ for high-powered devices.
Modern Operating System (IOS XE): Unlike 2960’s IOS Classic, Catalyst 9300 runs IOS XE, enabling model-driven programmability, streaming telemetry, and patching capabilities.
Simplified Management: Install mode simplifies stack upgrades by uploading images only to the master switch, with automatic distribution and upgrade of all members.
Enhanced Security: Supports 256-bit MACsec encryption, Cisco TrustSec, and hardware-based IPsec encryption for secure network traffic.
Part 2: Pre-Upgrade Environment Assessment for Cisco 2960 to 9300 Migration
Before beginning the upgrade from Cisco 2960 to 9300, conduct a thorough evaluation to ensure smooth transition and minimal downtime:
Network Architecture Review: Identify whether you run a traditional L2/L3 or software-defined access (SDA) architecture. Confirm presence and configuration of switch stacks.
Device Inventory and Model Verification: List all switches planned for upgrade. Understand that Catalyst 9300 models offer varied features and port densities suitable for different deployment scales.
Compatibility Check: Review Cisco IOS release notes for version compatibility. Some upgrades require stepping through intermediate versions. Confirm that Install Mode is supported (only on IOS XE).
Configuration Review: Prepare to migrate configuration block-by-block due to IOS differences; not all commands are directly transferable.
Part 3: Key Differences Between Cisco Catalyst 2960 and Catalyst 9300 Switches Explained
Part 4: Step-by-Step Upgrade Process from Cisco Catalyst 2960 to 9300 Using Install Mode
A typical Cisco Catalyst 9300 upgrade process using Install Mode includes the following detailed steps to ensure a smooth transition:
Ensure network reachability to the switch (via SVI or routed interfaces). Before starting the upgrade, verify that you can access the switch remotely or locally to avoid connection interruptions during the process.
Upload the new IOS XE binary image to a TFTP or FTP server. Place the appropriate Cisco IOS XE image file on a reachable TFTP or FTP server, ensuring proper network access and credentials for the switch to retrieve the image.
Copy the image to the master switch’s flash memory using the command:
copy tftp: flash:
This step transfers the IOS XE image from the server to the switch’s local storage.
Start the upgrade process with the command:
install add file flash: activate commit
This command installs the image on all members of the switch stack, activates the new IOS XE version, and commits the changes to finalize the upgrade.
Choose to reload immediately or defer the reload until a scheduled maintenance window. You can either reboot the stack right away to apply the new image or wait to minimize business impact.
After the reload, verify the upgrade success by checking the IOS version with:
show version
Confirm that all stack members are running the new IOS XE version and that the stack is stable.
The entire upgrade process typically takes about 20 minutes, depending on the stack size and network conditions.
Part 5: How to Migrate Security Configurations When Upgrading from Cisco 2960 to 9300
Command Differences: IOS XE’s MQC replaces MLS QoS configuration. Adjustments in QoS trust settings and interface commands are often required.
Security Enhancements: Leverage MACsec 256-bit encryption and Cisco TrustSec security groups (SGT) supported on Catalyst 9300.
IP Device Tracking: Migrate legacy IP Device Tracking (IPDT) to new SISF-based IP tracking features for enhanced host visibility.
Part 6: Troubleshooting Common Upgrade Issues from Cisco 2960 to 9300
Upgrade Stuck/Errors:
Always check release notes for compatibility and known issues before upgrading.
Test upgrades in non-production environments before mass deployment.
Follow prompts carefully during installation (e.g., press "Y" to confirm file extraction).
Power Issues:
Ensure power modules and fans are properly installed and connected.
Catalyst 9200CX supports high resilience with features like StackPower+ and redundant power.
Verify fan directions on models like Catalyst 9500X to maintain proper airflow.
Stacking Instability:
Use correct stack cables and follow Cisco’s stacking configuration guidelines.
Catalyst 9300X supports StackWise-1T and mixed stacking with 9300 series switches.
Dual supervisor engine IPsec HA stacks are not currently supported.
Part 7: Best Practices for Post-Upgrade Maintenance and Management
Baseline Configuration:
Apply a “golden configuration” after upgrade including hostname, SSH setup, VLANs, trunk ports, and basic Layer 2 security.
Use source control systems like Git to manage configuration changes with pull requests and change management.
Monitoring and Visibility:
Leverage streaming telemetry and application visibility features on Catalyst 9000 series.
Utilize Cisco ThousandEyes integration for next-gen observability beyond the campus network.
Patch Management:
Use IOS XE patching to apply fixes with minimal disruption.
Utilize hot patching and ISSU on Catalyst 9300X/9600 to minimize downtime.
Catalyst 9200 supports cold patching.
Device Reset:
Cisco Catalyst 9200CX offers factory-reset commands to clear all user data and reload to ROMMON mode if needed.
Unified Management:
Integrate switches with Cisco Catalyst Center (formerly Cisco DNA Center) for centralized upgrades and golden config deployment.
Enable zero-touch provisioning to automate configuration and upgrades after initial network connection.
Optionally manage via Meraki cloud dashboard for flexible operation.
Part 8: Cost and Procurement Considerations for Upgrading from Cisco Catalyst 2960 to 9300
Consider Cisco services and financing (Cisco Capital) to manage upgrade investments.
Take advantage of subscription-based IOS XE licensing for feature flexibility.
Part 9: Frequently Asked Questions About Upgrading Cisco Catalyst 2960 to Catalyst 9300 Switches
Q1: How long does the upgrade take? A: Approximately 20 minutes per switch stack with Install Mode.
Q2: Can I directly copy the 2960 config to 9300? A: Partial “lift and shift” is possible, but block-by-block migration with command adjustments is recommended.
Q3: What if the upgrade fails? A: Use backed-up configs and boot parameters to rollback, or seek help from Cisco support and community forums.
Part 10: Summary: Best Practices to Successfully Upgrade Cisco Catalyst 2960 to Catalyst 9300
Upgrading from Cisco Catalyst 2960 to Catalyst 9300 significantly enhances your network’s performance, security, and management capabilities. By thoroughly assessing your environment, carefully migrating configurations, and following best practices during the upgrade, you can ensure a smooth and efficient transition.
Leverage Cisco’s modern IOS XE platform and Install Mode features for easier maintenance and future scalability. For official guides and detailed documentation, visit: