Do you have a Cisco 8800 IP Phone? Do you know how to set up your 8800 IP Phone? Here is a configuration guide.
There are four procedures to set up your phone:
- Adjust the Handset Rest
- Change the Viewing Angle of Your Phone
- Connect to the Network
- Secure the Phone with a Cable Lock
Adjust the Handset Rest
If your phone is wall-mounted or if the handset slips out of the cradle too easily, you may need to adjust the handset rest to ensure that the receiver does not slip out of the cradle.
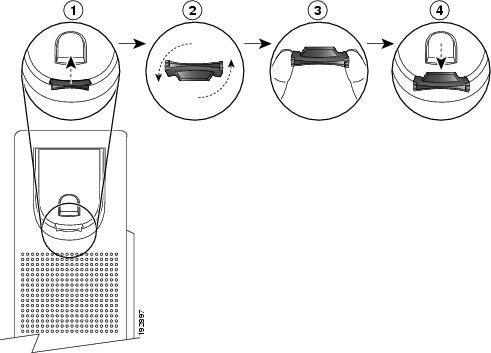
Detailed procedure
1 - Remove the handset from the cradle and pull the plastic tab from the handset rest.
2 - Rotate the tab 180 degrees.
3 - Hold the tab between two fingers, with the corner notches facing you.
4 - Line up the tab with the slot in the cradle and press the tab evenly into the slot. An extension protrudes from the top of the rotated tab.
5 - Return the handset to the handset rest.
Change the Viewing Angle of Your Phone
You can change the angle of the phone to eliminate glare on the screen. If your phone has a video camera , you can change the angle to improve the camera view.
Detalied Procedure
1 - Hold the receiver in the cradle with one hand.
2 - Move the footstand with the other hand to change the angle.
3 - (Optional) Adjust the footstand on the key expansion module and ensure that the phone and key expansion module are stable.
4 - (Optional) Press Self-view to check the camera angle.
Connect to the Network
You need to connect the conference phone to the telephone network.
Wired connection—The phone is plugged into the network using an Ethernet cable.
Wireless connection—The Cisco IP Phone 8861 and 8865 can connect to a Wireless Access Point using Wi-Fi.
Virtual Private Network (VPN)—After the phone is connected to the network, it is set up to automatically connect into a protected network.
Mobile and Remote Access Through Expressway—After you connect the phone to the network, it connects to the Expressway server automatically.
Set Up Wi-Fi Client.
The Cisco IP Phone 8861 and 8865 can access a Wi-Fi network, but a power adaptor is required to power the phone. The Cisco IP Phone 8865NR cannot be used with a Wi-Fi network.
Note: The phone PC port is disabled when Wi-Fi is enabled on your phone.
*Before You Begin: Your administrator needs to configure settings on the call control system to enable Wi-Fi access.
Detailed procedures
|
Step 1 |
If the phone is plugged into the Ethernet, unplug the Ethernet cable. |
|
Step 2 |
Press Applications |
|
Step 3 |
Navigate to Admin settings > Network setup > Wi-Fi client setup > Wi-Fi sign in access. |
|
Step 4 |
Navigate to Wireless and press On. |
|
Step 5 |
Navigate to Wi-Fi sign in access and press On. |
|
Step 6 |
Press Apply to save the changes, or press Revert to cancel the changes. |
Connect to a Pre-Configured Wi-Fi Network.
You can connect to a Wi-Fi network with your Cisco IP Phone 8861 and 8865. But the Cisco IP Phone 8865NR does not support Wi-Fi.
Depending upon how your phone is configured, you could be required to sign in when you join a Wi-Fi network or when your phone powers up.
You cannot dismiss the Wi-Fi sign-in window without entering the correct username and password.
Detailed Procedure
1 - Enter your Wi-Fi credentials when prompted.
2 - Select Sign-in.
Connect to a VPN.
You connect to your VPN in one of two ways:
- By entering credentials (username and password, or just a password)
- With a certificate
If you have a certificate installed on your phone, you do not need to do anything. Your phone automatically connects to the VPN.
Detailed Procedure
1 - When prompted, enter your VPN credentials.
2 - Select Sign-in.
Set up a Phone for Use with VPN
*Before You Begin: To complete this procedure, you must have a valid TFTP server address. If you do not have this information, contact your administrator.
You cannot use the Wi-Fi client with the Cisco IP Phone 8865NR.
Detailed Procedure
1 - Press Applications .
2 - Select Admin settings.
3 - Select one of the following menu items:
All phones connected to the Ethernet: Ethernet setup
Cisco IP Phone 8861 and 8865 users that use Wi-Fi: Wi-Fi client setup
4 - Select IPv4 Setup.
5 - Navigate to Alternate TFTP and choose On.
6 - Select TFTP server 1.
7 - Enter your TFTP server address in the TFTP server 1 field.
8 - Press Apply.
9 - Press Continue.
10 - Press Exit.
Connect to Expressway
You can use Mobile and Remote Access Through Expressway to connect into your corporate network when you are working away from your office. Because your phone does not have a TFTP address configured, the phone displays a Welcome screen to begin the sign-in process.
*Before You Begin: If you have been using your phone at the office or with a VPN, reset your service mode before you connect to Expressway.
If you need to connect to Mobile and Remote Access Through Expressway on-premise, restart your phone and press Select when prompted.
Detailed Procedure
1 - Enter your activation code or service domain on the Welcome screen.
2 - Enter your username and password.
3 - Press Submit.
Activate Your Phone Automatically with a QR Code
If your phone has a camera, you can scan a QR code to activate the phone. If you inadvertently press Enter manually, press Back to return to the QR code screen.
Before You Begin
You need the QR code from your welcome message.
If the code from your welcome message has expired, generate an activation code for your device with the Self Care portal or request an activation code from your administrator.
Detailed Procedures
Step 1 - Make the QR code ready with one of these methods:
Print the email with the QR code and hold the paper in front of the phone camera.
Display the QR code on your mobile device and hold the device in front of the phone camera.
Display the QR code on your computer and hold the phone in front of the computer screen.
2 - Turn the ring around the camera clockwise to open the shutter.
3 - Scan the QR code. When the scan succeeds, your phone registers with the server, and you're ready to make your first call.
Secure the Phone with a Cable Lock
You can secure your Cisco IP Phone 8800 Series with a laptop cable lock up to 20 mm wide.
Detailed Procedures
1 - Take the looped end of the cable lock and wrap it around the object to which you want to secure your phone.
2 - Pass the lock through the looped end of the cable.
3 - Unlock the cable lock.
4 - Press and hold the locking button to align the locking teeth.
5 - Insert the cable lock into the lock slot of your phone and release the locking button.
6 - Lock the cable lock.
More details: Cisco IP Phone 8800 Series User Guide


