


Are you an IT administrator or procurement manager grappling with network segmentation, performance, and security challenges in your small to medium-sized business? Understanding VLANs and inter-VLAN routing is crucial for designing an efficient and secure network infrastructure. This step-by-step guide clarifies these concepts, their practical applications, and provides CLI-based configuration examples to help you build a scalable Cisco network.
What is a VLAN and Why Do You Need It?
A VLAN (Virtual Local Area Network) is a logical segmentation of a Layer 2 network, allowing you to partition a physical switch into multiple virtual switches, each functioning as an independent broadcast domain.
Why VLANs Matter:
- Segmentation: VLANs limit broadcast domains, reducing unnecessary traffic.
- Security: VLANs isolate departments (e.g., HR, Finance) to prevent unauthorized access.
- Performance: Smaller broadcast domains improve network efficiency.
- Flexibility: VLANs allow logical grouping of devices regardless of physical location.
How to Configure VLAN on Cisco Switches
Follow these steps to configure VLANs on your Cisco switches:
- Create VLANs
Define VLANs and assign descriptive names:Switch(config)# vlan 10 Switch(config-vlan)# name HR_VLAN Switch(config-vlan)# exit Switch(config)# vlan 20 Switch(config-vlan)# name Finance_VLAN Switch(config-vlan)# exit - Assign Ports to VLANs
Assign access ports to specific VLANs:Switch(config)# interface GigabitEthernet1/0/1 Switch(config-if)# switchport mode access Switch(config-if)# switchport access vlan 10 Switch(config-if)# exit - Configure Trunk Ports
Trunks carry multiple VLANs across switches or to routers:
Ensure the native VLAN matches on both trunk ends (default is VLAN 1).Switch(config)# interface GigabitEthernet1/0/24 Switch(config-if)# switchport mode trunk Switch(config-if)# exit - Verify VLAN Configuration
Check your VLAN setup:
Check trunk status:Switch# show vlan briefSwitch# show interfaces trunk
What is Inter-VLAN Routing on Cisco Switches?
VLANs isolate devices at Layer 2, preventing inter-VLAN communication by default. Inter-VLAN routing enables communication between VLANs by routing traffic at Layer 3 using a router or Layer 3 switch.
Each VLAN typically corresponds to a unique subnet, and a Layer 3 device routes traffic between them.
Methods of Inter-VLAN Routing
- Router-on-a-Stick
Uses a single physical router interface configured as a trunk with subinterfaces for each VLAN.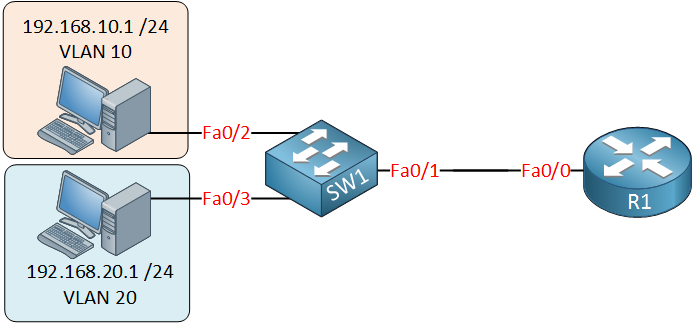
Pros:- Cost-effective for small networks.
- Single point of failure, limited scalability, potential performance bottleneck.
- Layer 3 Switch Using Switched Virtual Interfaces (SVIs)
A Layer 3 switch (multilayer switch) handles routing internally using SVIs, with each SVI acting as the default gateway for its VLAN.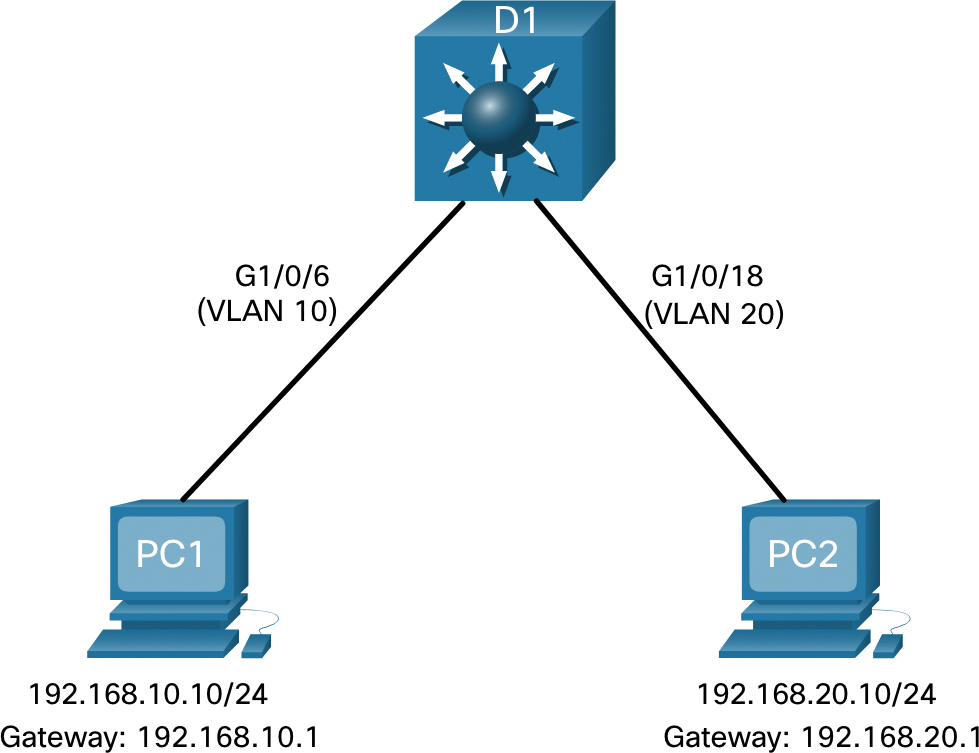
Pros:- High performance, scalable, reduces latency.
- Higher initial cost than a Layer 2 switch.


How to Configure Inter-VLAN Routing on Cisco Switches
Method 1: Router-on-a-Stick Configuration
On the Layer 2 Switch:
Switch(config)# interface GigabitEthernet0/24
Switch(config-if)# switchport mode trunk
Switch(config-if)# exit
On the Router:
Router(config)# interface GigabitEthernet0/0
Router(config-if)# no shutdown
Router(config-if)# exit

Router(config)# interface GigabitEthernet0/0.10
Router(config-subif)# encapsulation dot1Q 10
Router(config-subif)# ip address 192.168.10.1 255.255.255.0
Router(config-subif)# exit

Router(config)# interface GigabitEthernet0/0.20
Router(config-subif)# encapsulation dot1Q 20
Router(config-subif)# ip address 192.168.20.1 255.255.255.0
Router(config-subif)# exit
Method 2: Layer 3 Switch Using SVIs
- Enable IP Routing:
Switch(config)# ip routing - Create SVIs:
Switch(config)# interface Vlan10 Switch(config-if)# ip address 192.168.10.1 255.255.255.0 Switch(config-if)# no shutdown Switch(config-if)# exit Switch(config)# interface Vlan20 Switch(config-if)# ip address 192.168.20.1 255.255.255.0 Switch(config-if)# no shutdown Switch(config-if)# exit - Save Configuration:
Switch# write memory
-- or --
Switch# copy running-config startup-config
How to Verify VLAN and Inter-VLAN Routing Configuration
- Check interface status:
Switch# show ip interface brief - Check routing table:
Switch# show ip route - Ping across VLANs to confirm inter-VLAN routing is operational.
Best Practices for VLAN and Inter-VLAN Routing
- Use a dedicated management VLAN (not VLAN 1).
- Ensure native VLAN consistency across trunks.
- Map one VLAN per IP subnet for clarity.
- Use EtherChannel on uplinks for redundancy and bandwidth.
- Use HSRP or VRRP for gateway redundancy in critical environments.
- Enable ip routing on Layer 3 switches.
- Always save configurations after changes.
Frequently Asked Questions (FAQ)
Q1: What Are the Drawbacks of Each Method?
- Legacy Routing: Limited by physical router interfaces; not scalable.
- Router-on-a-Stick: Single point of failure, possible congestion, limited to ~50 VLANs.
- Layer 3 Switch Routing: Higher initial hardware cost but better overall value for scalability and performance.
Q2: What are two actions performed by a Cisco switch?
A Cisco switch performs MAC address learning and Layer 2 forwarding while enabling VLAN segmentation.
Q3: How do I save configurations on a Cisco switch?
Use write memory or copy running-config startup-config to save configurations.
Q4: Can a Switch Perform Inter-VLAN Routing?
Yes. Certain switches called Layer 3 switches or multilayer switches can perform inter-VLAN routing. They operate at both Layer 2 and Layer 3, using Switched Virtual Interfaces (SVIs)—logical Layer 3 interfaces configured on the switch. SVIs serve as default gateways for their VLANs and handle routing in hardware. To enable this, IP routing must be globally enabled on the switch, and the VLAN must be active with at least one access or trunk port in forwarding state; otherwise, the SVI will show as down.
Next Steps
Ready to improve your network infrastructure with VLANs and inter-VLAN routing? Explore our range of Cisco Switches, including Cisco Catalyst 3850 Series and Cisco Catalyst 4500 Series Layer 3 switches for advanced inter-VLAN routing, or browse our Cisco Routers for your routing needs.

Expertise Builds Trust
20+ Years • 200+ Countries • 21500+ Customers/Projects
CCIE · JNCIE · NSE7 · ACDX · HPE Master ASE · Dell Server/AI Expert